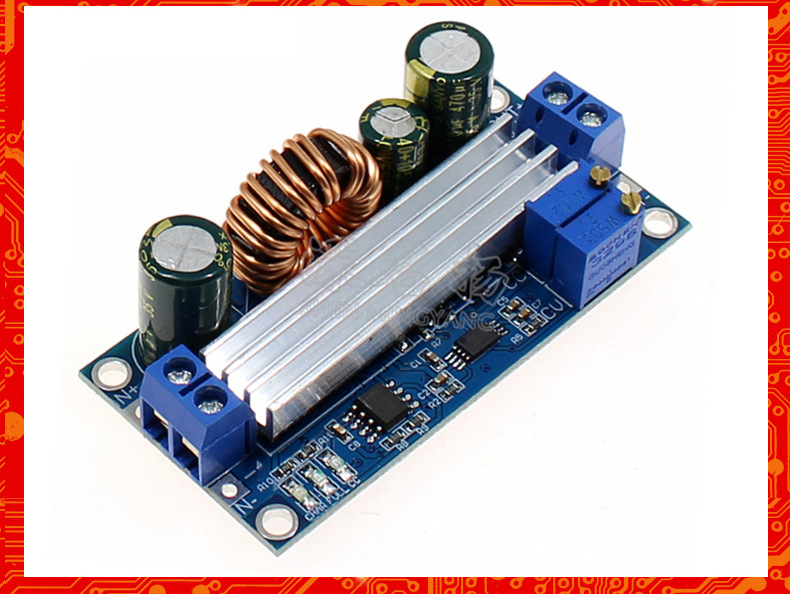
Constant voltage and constant current adjustable automatic booster power module Booster module Solar charging 4A
Product characteristics
Wide voltage input 5-30V, wide voltage output 0.5-30V, both boost and buck, such as you adjust the output voltage to 18V, then the input voltage between 5-30V random changes, will be a constant output of 18V; For example, you input 12V, adjust the potentiometer set 0.5-30V arbitrary output.
High power, high efficiency, better performance than XL6009/LM2577 solution. An external 60V75A high-power MOS is used and coupled with a high-current and high-voltage Schottky diode SS56. It is not comparable to SS34 of 6009 or 2577 schemes, because according to the principle of rising and falling voltage, the voltage withstand of MOS and Schottky is greater than the sum of input and output voltage.
Iron silicon aluminum magnetic ring inductance, high efficiency. No inductive whistling in constant current mode.
The current size can be set for limiting output current, constant current drive, and battery charging lights.
With its own output anti-back-flow function, there is no need to add an anti-back-flow diode when charging the battery.
Instructions for use
1. Used as an ordinary booster module with over-current protection
How to use:
(1) Adjust the CV constant voltage potentiometer so that the output voltage reaches the voltage value you want
(2) Measure the output short-circuit current with the multi-meter 10A current stop (directly connect the two pens to the output end), and adjust the CC constant current potentiometer to make the output current reach the predetermined over-current protection value. (For example, the current value displayed by the multi-meter is 2A, then the high current can only reach 2A when you use the module, and the red constant voltage constant current indicator is on when the current reaches 2A, otherwise the indicator is off)
Note: When used in this state, because the output has a current sampling resistance of 0.05 Ohm, there will be a voltage drop of 0~0.3V after connecting the load, which is normal! This voltage drop is not pulled down by your load, but down to the sampling resistance.
2. Use as a battery charger
The module without constant current function can not be used to charge the battery, because the pressure difference between the battery and the charger is very large, resulting in excessive charging current, resulting in battery damage, so the battery should be used at the beginning of the constant current charging, when the charging to a certain extent, the automatic switch back to constant voltage charging.
How to use:
(1) Determine the floating charge voltage and charging current of the battery you need to charge; (If the lithium battery parameter is 3.7V/2200mAh, then the floating charging voltage is 4.2V, and the large charging current is 1C, that is, 2200mA)
(2) Under no-load conditions, the multi-meter measures the output voltage, and the constant voltage potentiometer is adjusted to make the output voltage reach the floating charge voltage; (If you charge a 3.7V lithium battery, adjust the output voltage to 4.2V)
(3) Measure the output short-circuit current with the multi-meter 10A current stop (directly connect the two pens to the output end), and adjust the constant current potentiometer to make the output current reach the predetermined charging current value;
(4) The default charging current is 0.1 times the charging current; (The battery current in the charging process is gradually reduced, gradually from constant current charging to constant voltage charging, if the charging current is set to 1A, then when the charging current is less than 0.1A, the blue light is off, the green light is on, at this time the battery is charged)
(5) Connect the battery and charge it.
(Steps 1, 2, 3, 4 are: the input end is connected to the power supply, and the output end is not connected to the battery.)
3. Used as a high-power LED constant current driver module
(1) Determine the operating current and high operating voltage you need to drive the LED;
(2) Under no-load conditions, the multi-meter measures the output voltage, and the constant-voltage potentiometer is adjusted to make the output voltage reach the high working voltage of the LED;
(3) Use a multi-meter 10A current to measure the output short-circuit current, and adjust the constant current potentiometer to make the output current reach the predetermined LED working current;
(4) Connect the LED and test the machine.
(Steps 1, 2, and 3 are: input is connected to the power supply, output is not connected to the LED light.)


Products categories
-

Phone
-

E-mail
-

Whatsapp
-

Skype
-

Skype
-

Skype


